


 Contact
Resources
Products
Home
Contact
Resources
Products
Home
Sod Installation & Maintenance
Step 1: Measuring your yard
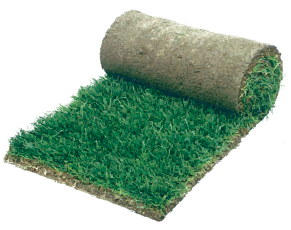
The first thing you must do is measure the area of your yard. Sod is sold by the
square foot in rolls that are 6 feet by 1.5 feet, so square yards must be converted
to square feet. For rectangular or square areas, simply multiply the length by the
width (in feet) to get your square footage.
For odd shaped areas, either break the area down into as many measurable rectangles
and squares as you can, or measure the longest and widest points and multiply, remembering
to round up.
It is recommended to add 5% to your final measured amount. This saves you from having
to wait for more sod to be delivered, having to keep the bare yard dry while watering
the area where sod is already applied and ensures your lawn has an even, healthy
appearance.
Step 2: Preparing Your Yard For Sod
Wait 1-2 weeks and reapply, making sure any new growth of turf and weeds are killed.
When your old lawn is completely dead, it must be removed. We recommend renting a
sod cutter, which will help cut your lawn into small, thin, easily removed strips.
When using the sod cutter, be mindful of sprinkler placement. After your old lawn
is removed, rake the soil to remove any remaining grass or debris and dispose of
it. Watering the area for a few days will allow you to see if anything grows back
and, if necessary, kill off the new growth with another application of herbicide.
When the ground is free of all growth and sufficient time has passed following herbicide
application (see instructions on package as manufacturer specifications vary), rototill
your yard to a depth of 4-6 inches, which will aid in eliminating drainage issues.
Spread any soil amendments such as compost or gypsum evenly across the area and rototill
the amendments into the soil until thoroughly mixed with existing soil.
If you are planning on installing a sprinkler system, this is the time to do it.
Keep in mind that a system with a timer will make sod maintenance much easier, especially
in the weeks immediately following installation.
Rake the entire area and level it, with the ideal height being about one inch below
the level of borders, sidewalks and the tops of sprinkler heads. Using a water-filled
sod roller, compact the surface, checking for low spots that need to be re-graded
with a rake before being rolled again.
Step 3: Installing Your Sod
Step 4: Maintaining Your New Lawn
The first step is to remove any existing lawn, including all weeds, clods and debris.
Ideally, you would start this step three weeks before you plan to install your sod,
allowing you ample time to ensure all remnants of your previous yard, especially
hardy weeds have been eliminated at their lowest depths.
Begin with a well-watered, fast growing yard so that you can be sure you are killing
all vegetation, especially weeds. If you skip this step, you run the risk of not
addressing dormant weeds. Start the removal process by applying an herbicide like
Round-Up to the entire lawn, following all directions for the product closely.
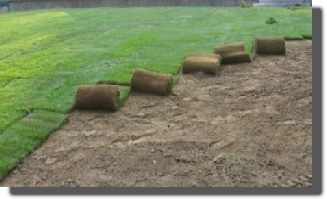
You will need to install sod the day it arrives. If you cannot install the sod early
that morning and must wait until the afternoon, keep the sod in a shaded area and
mist it every few hours. Do not cover it with anything but completely porous material.
Apply starter fertilizer on top of surface immediately before installing sod (should
say "starter" on the bag- we recommend our custom Act of Sod starter). Be sure your
ground is dry when installing sod. Start at the longest straight edge and continue
from there. Place each new roll up against the side of the previously laid roll,
taking great care not to overlap rolls. To ensure a great looking lawn, be sure to
stagger the seams when laying sod, similar to laying bricks. This prevents gaps in
your lawn that stem from misalignment of rolls.
In very hot weather (85+ degree days) lightly water the sodded areas after you have
installed 200-300 square feet.
After all sod is installed, go over it with a roller. This will ensure that your
sod has sufficient contact with the surface underneath, as well as removing any air
pockets. Make sure that the roller is filled only halfway with water; otherwise it
will leave imprints in your sod. After rolling, water the lawn until the lawn is
properly saturated, stopping before water pools on the surface.
Properly maintained sod will thrive indefinitely. But because our sod is free of
weeds unlike most natural or seeded lawns, lack of maintenance will show a decline
in lawn quality quickly. To preserve your yard’s appearance for years to come, follow
these tips.
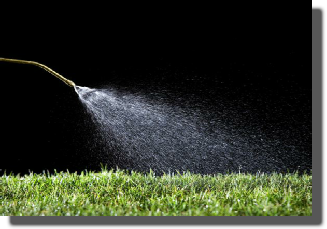
Water is by far the biggest determinant in how successful your new lawn will be.
For the first two weeks following installation it is crucial that you water 3-4 times
a day for 10-20 minutes each period, with the first watering in the early morning
hours. In very hot weather or for lawns with low sprinkler pressure you may need
to water as many as 5-6 times a day for 30 minute periods. Look for your lawn to
appear saturated but without pools of water on the surface.
Watering: The Number One Secret to a Great Looking Lawn
Additional Tips to Care For Your New Lawn:
- Stay off your new lawn as much as possible for the first two weeks so that the roots
can adhere to your soil.
- Avoid fertilizing your sod until it has been in for approximately 6 weeks. Trust
that the pre-installation fertilization will do its job.
- Do not mow your lawn for the first two weeks after installation. Prior to your first
mowing, change your mower’s setting to the highest possible level.

Regular fertilization is one of the keys to your lawn’s long term success. If you
notice a neighbor whose lawn always seems to be more healthy and vibrant in color
than anyone else’s, chances are they fertilize frequently and consistently. Please
consult with your local nursery about which fertilizer(s) are right for your sod
type and application, but here are some general tips:
- On every fertilizer package, you will see 3 number ratios. They are always in this
order: Nitrogen-Phosphorous-Potassium, or N-P-K
- Premium Blue, Premium Blue Rye, and Premium Fescue Blue should be fertilized about
every 3-4 weeks
- Premium Fescue, Premium Fescue Rye, and Bonsai Fescue should be fertilized approximately
every 4-6 weeks
- In Spring, it is recommended to use a fertilizer with a low number in the nitrogen
formula
- In Summer, look for a fertilizer with a “slow release” nitrogen formula
- In Fall and Winter, use a fertilizer specially formulated for this time of year (often
labelled a “winterizing” fertilizer)